
Building my Sauna
The room
 D
D
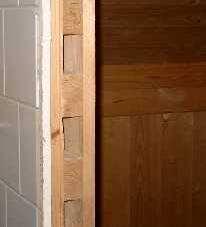
Our house is made of wood, using the Lignotrend system. The outside walls of the house are made of three layers of solid wood, separated by two layers of spaced battens. One of the sauna walls is an outside wall. The inside walls of the sauna are made of a thinner version of the same system, with two layers of solid wood. The picture shows one of the inside walls. In the background are the outside wall and the sauna ceiling.
The roof is insulated with cellulose insulation. Cellulose insulation is not so sensitive to moisture as, for example, mineral wool or glass fiber. But there are limits to how much it can take, so the roof insulation is protected by a layer of vapor retarder to stop moisture getting into it too quickly.
 D
D
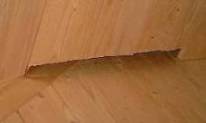
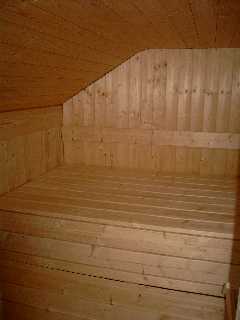
The ceiling slopes down to a height of 1.4 meters at the outside wall. On the opposite side it sloped up to well over 2 meters. There was no sensible way of organising benches and platforms to make use of the higher part of the room, so the first thing I did was to bring the ceiling down to 1.95m, just higher than the door. The picture shows the ceiling before I put the boards on the lowered part, with the edge of the remaining sloping part of the ceiling at the top right. Resting on the horizontal battens there are sheets of soft wood-fiber insulation. Between the insulation and the sloping ceiling you can see the blue vapor retarder of the roof.
 D
D
For ventilation I made a hole in the wall under where the stove was to go and left a gap between part of the ceiling and the wall at the other end of the room. The air coming out of this goes into the space between the sloping roof and the lowered ceiling: there is another hole in the wall above the ceiling to let the air out. The hole in the sauna ceiling is not particularly tidy, but in the finished sauna it is not visible.
Insulation
The wooden walls insulate quite well. To keep energy consumption down and to protect the wall structure from extreme temperature variations, I covered them with 2cm of soft wood-fibre insulation, the same as was used on the outside of the house. For most kinds of wall construction, considerably thicker insulation is needed, usually glass or mineral fiber. The advantage of using wood-fiber insulation was that I could just just nail it to the wall with wide-headed nails and then nail the battens for the interior cladding on top of it. For most kinds of insulation, you have to attach thick pieces of wood to the walls and hang the insulation up between them.
 D
D
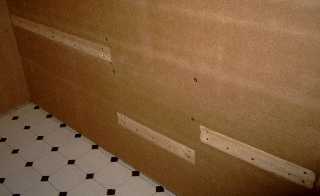
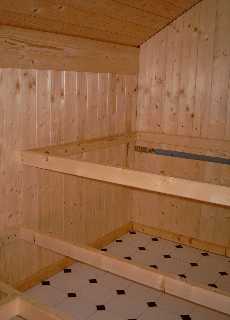
Whatever kind of insulation you use, if you are going to fix anything heavy to the wall in the finished sauna, you need to take account of this by leaving a gap in the insulation and attaching wood of the thickness of the insulation to the walls to carry the weight. The picture shows the insulation on a part of one wall with wood set into it for a high wide platform and a lower narrower bench, and for the stove near the door. There is a gap between the bottom of the insulation and the floor so that if the floor gets wet the insulation will not be affected.
To avoid condensation within the insulation or between the insulation and the wall, I put a layer of vapor retarder over the insulation. A vapour retarder rather than a vapour barrier was enough because wood and wood fibre insulation are not too sensitive to moisture: the fibres spread the moisture out and it can find a way out given time. It also has the advantage of being more tolerant of mistakes: if there is a hole in a vapour barrier, any water that gets in through it can only get out through it. A vapour barrier would have been easier to find in the shops. Most vapour retarders are only approved for use up to 80°C. In any case, for other kinds of insulation or walls a vapour barrier is absolutely necessary to avoid problems with damp and mould.
Cladding
 D
D
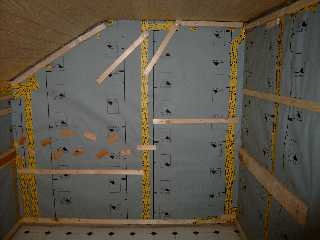
On top of the vapor retarder or barrier come battens for the interior cladding to be fixed to. Once again, if there is going to be anything heavy hung on the walls, a load-bearing structure must be built into this layer as well. The picture shows the horizontal battens for the cladding and the structure for the back platform on the wall on the right. On the right of the back wall there are horizontal battens as well; on the left the picture is rather more interesting, due to the slightly experimental ventilation system built into the wall:
If the air comes into a sauna at the bottom and leaves at the top, the result is a fairly steep temperature gradient going from cold at the bottom to very hot at the top. Although some temperature difference is desirable, so that those who want to can sit lower down and be cooler, it would be better for the temperature above the highest bench or platform to be more or less uniform. This can be achieved by having the air outlet just below that platform. Unfortunately, the temperature gradient is then insufficient for convection to keep the air moving. One solution is to have forced ventilation, with a fan in the inlet. My solution was to make the convection current take a detour: the air comes in at the bottom and goes out at the top, but to get to the top it has to go through the inside of the back wall under the cladding. Horizontal battens would get in the way, so I used diagonal battens near the top, to help guide the air towards the outlet in the ceiling, and lower down I used separate pieces of wood positioned to be under the joins in the cladding. The ventilation works.
 D
D
For interior cladding I used ordinary tongue-and-groove boards. Special sauna cladding with wider tongues and deeper grooves is available, but is only 8mm thick and I find it unattractive. Apart from that, I wanted to get more wood into the sauna to make it smell better for longer. If you don’t use the special cladding, you have to know you can trust your timber merchant to sell you nice dry wood that isn’t going to shrink. The picture shows the back left corner with the interior cladding with the ventilation slit in it and the supporting frames for the bench and platform. Where I used two pieces of cladding rather than one from ceiling to floor, the join is hidden behind the frames. The beam that the roof sits on is covered with its own horizontal plank, with thin laths underneath it so that the air can circulate. The cladding stops a centimeter or so above the floor to keep it out of the wet when the floor is washed and to let air circulate behind it. I put a skirting board at the bottom of the cladding; this is also a couple of millimeters above the floor.
Furnishings
Traditionally, everything in a sauna was made of spruce or pine. These days, in public saunas in Europe, sauna benches are usually made of light porous tropical wood such as obeche (triplochiton scleroxylon). The advantages of obeche are that it has no resin, holds little heat and does not produce splinters. The disavantages are that it smells of nothing and is more sensitive to dirt, so you have to sit on a towel. The advantages of spruce are that it smells better and doesn’t have to be carted half way around the world. The disavantages are that it contains resin, can splinter and feels hotter to the touch, so you have to sit on a towel.
The problem with resin is that at sauna temperatures it melts and drips. Luckily, you can see the places where this is likely to happen (holes, usually long and thin, with resin in them) and put them where they won’t drip onto anyone’s skin. I put most of the resin holes in the cladding in the corner by the stove and the rest below the level of the benches. The good thing about resin is the smell. Those who build saunas for other people are probably wise to use obeche for the benches (and will protect themselves adequately against the allergenic sawdust). If you are building a sauna for yourself you may want to consider spruce. (I have heard that in America, they use a lot of cedar in saunas. That would have the advantage of keeping the moths away, of course.)
| Wood | Heat capacity | Resin content | Structure |
|---|---|---|---|
| Spruce | Relatively high, therefore hot to the touch: you have to sit on a towel. | Contains resin. Smells good, but you have to be careful where you put the resin holes. | Fibrous, may produce splinters. You have to sit on a towel, and it’s a good idea to check it over with a piece of sandpaper in your hand every year or so. |
| Obeche | Relatively low, feels cooler to the touch. | No resin at all, smells of nothing. | Porous, traps dirt easily. You have to sit on a towel, and it’s a good idea to rub special sauna oil into it every year or so. |
 D
D
I used spruce planks, 14cm broad and 26mm thick, with 1cm gaps between them. The big platform at the back is in two parts to make it easier to take it out or move it to clean underneath. I used the same planks for the backrests. Since I had used fairly substantial cladding, I didn’t need to worry about a supporting structure for the backrests. After seven years of use (as of May 2010), we still have not had any problems with splinters, and the sauna still smells woody.
Doors and Stoves
The door and the stove are the parts of a sauna you are least likely to make yourself.
I got a ready-made Tylö safety-glass sauna door, with a frame. It was the most expensive single item in the whole sauna, there is absolutely nothing wrong with it, and it will no doubt last for ever. However, covering the exposed parts of the wall outside the frame and making a reasonable optical transition to the cladding inside and the bathroom wall outside was a very fiddly job. If I were doing it all again, I’d ask a joiner and a glazier for a quotation. (Maybe I would then buy a ready-made door …)
 D
D
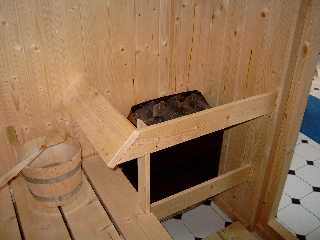
A sauna is heated by stones. The stove, which heats and holds the stones, is therefore the heart of the sauna. Choosing a stove was not an easy task: at first sight there seemed to be no end of different stove manufacturers. Closer investigation revealed in the end that, leaving out the cheap and cheerful local supplier, there were only three that really matter: Saunatec and Harvia in Finnland, and Tylö in Sweden. The apparent variety comes from the fact that the Finnish companies sell to different market segments under different brand names. When I built my sauna (2003), Saunatec was getting better reviews than Harvia. Tylö stoves heat some of the air directly and have fewer stones than comparable stoves from other manufacturers. This means they can heat up more quickly. What effect, if any, this has on the quality of the sauna air I do not know: I got a Saunatec stove, and it works fine.
So far only one slight problem has arisen: after a few months the stove started giving off an unpleasant smell. It turned out that the stones had shifted so that a large part of one heating element was no longer in contact with any stones. Since nothing but air was taking the heat out of it, it was getting too hot. Stones rearranged; problem solved.
Further reading on saunas
Michael Cankar’s site provides information on the history and culture of the sauna, a sauna lexicon, basic information on construction, and more.
At sauna.org there is information on more or less everything, including many more links for the interested and curious.
